How to Make Max’s Boots
by Max Replica
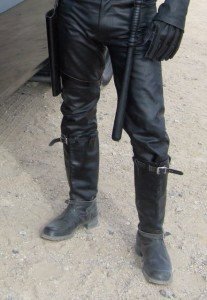
First off, pics of my MM1 MFP boots, and my MM2 Road Warrior boots:
MAD MAX (FILM ONE)
The boots Max wears in the first movie are 1970s Australian Rossiter aka Rossi motorcycle boots.
(more info here: http://madmaxcostumes.com/boots.htm)
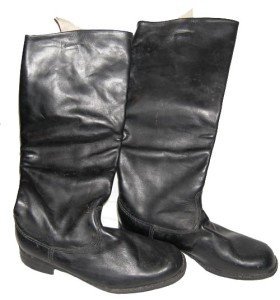
Given that these are now rare and expensive the best option is to have a pair of less expensive boots modified. Old Russian (or similar country like Ukraine) military boots are a good match. Vintage style German officer boots can also work. The bottom portion of the boots is nearly identical, only a very close look will reveal that the overlap is opposite where the two parts of the boot come together (i.e the seams are a little different).
A quick note on sizing – there are charts online that will convert the size numbers of Russian boots to U.S. and other sizes but you should only use this as a ballpark figure. I always ask the seller for an actual measurement of the bottom of the boot from heel to toe and then compare this with a pair of my own boots to determine if they’ll fit right.
The Russian boots can be modified by a good shoe repair or custom leather shop. But finding one that can do it right can be a bit tricky. The modifications to the boots can be done from photos but it’s best if you can provide the shop with a real pair of accurate boots that they can borrow to use as reference while modifying. I was lucky to find a very qualified shop and even luckier to have on loan Karol’s personal pair of vintage Rossi boots when I got mine done.
KNOW BEFORE YOU BUY:
The first important thing when looking for Russian boots is to make sure that the leather is smooth. Many of the ones that appear on eBay these days have an incorrect rough or “pebbled” texture to the leather.
Here are the incorrect boots with the pebbled texture:
[avia_table]
[/avia_table]
MODIFICATIONS:
Modifications to the boots consist of a strip of leather added down the back (often will need to be hand-stitched at the heel to be done correctly), two loops added to the back strip for holding the boot straps to the back of the boot, two side loops to hold the strap at the top of the boot, boot straps created and added at the top and the bottom, the top of the boots cut off and a notch cut in the front, and several cuts at the front top of the boot for putting the straps through.
Below are pictures of my replica MFP boots created in this way:
WEATHERING:
The gear Max wears in the first movie is basically new so not much in the way of weathering should be needed with these boots. However, you don’t want them polished either, so if you get a pair that is really shiny you may want to try some alcohol or acetone to take some of the shine off.
Note: You’ll also need a badge to add to your right boot for MFP accuracy. There seem to be some folks out there that think the badge on Max’s boot is slightly smaller than the one on his jacket. I don’t think this is correct. They appear to be the same size. Check out the scene where Max opens the wooden chest where his uniform is stored – you’ll see the two badges close to one another and they appear to be the same size. Also, this was a low budget movie, I doubt they created more than one run of badge sizes.
MAD MAX 2: THE ROAD WARRIOR
I have also had a pair of MM2 Road Warrior boots made:
The boots Max wears in the second movie are a modified version of his boots from film one.
More info here: http://madmaxcostumes.com/C2/max-boots.htm
MODIFICATIONS:
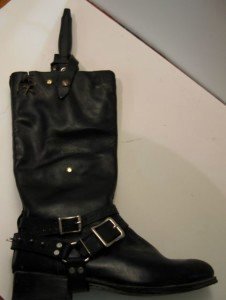
The changes from the film one boots are that the two top straps are removed, a pair of boot harnesses (or “boot bracelets”) are added, and the right boot has the top right loop removed, two rivets on the right side of the right boot added and a sewn-up cut on the right side of the right boot added.
The cuts and rivets on the right boot are probably related to the fact that Max carries his Gerber boot knife on that side.
Here are the Russian boots I had modified into MM2 boots.
[avia_table]
 |
The leg brace can be seen attached to the left boot in the following picture, that brace was covered in detail in another tutorial. See: How to Make Max’s Leg Brace |
 |
Max’s Gerber boot knife can be seen in the right boot in the photo above. For full info on the knife, see the MM2 Boots page |
[/avia_table]
HARNESSES:
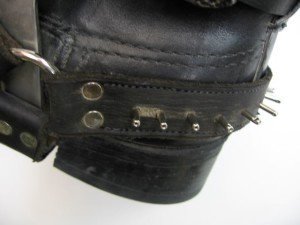
Some detail on the boot harnesses:
Max’s harnesses use either a D-ring or an O-ring to hold them together. I am 90% convinced that it’s a D-ring because I believe I can see a bottom corner of the ring in some screen shots. Karol is only 75% convinced, I think. But one thing is for certain, the rings are definitely rounded at the top and not triangular.
On the back of each harness is a row of metal points or spikes. We believe these to be the ends of rivets – the male ends of large two-part leatherwork rivets. There is some evidence to support this. The large rivets I used have holes in their ends. I believe I see holes like these in one of the HD screenshots, helping support the rivet theory. Also, it looked from at least one screenshot like the ends of the metal points dimple in, also like large rivets do.
The riveted part of the strap has a line of stitching top and bottom, this is because two pieces of leather are sandwiched to hold the rivets in place.
Detail photo:
[avia_table]
[/avia_table]
THE BOOT KNIFE SIDE:
The two rivets on the side of the boot in the movie are probably used in some way to hold the knife sheath in place. There are often times in the movie when Max’s knife shifts forward and falls toward the front of his boot. Probably related to the fact that he has a rivet toward the back, and one on the bottom, but no rivet toward the front to hold the knife there.
I added some hidden velcro in my boot to hold the knife sheath in place better.
[avia_table]
 |
The cut and knot are a bit hard to see in the movie, so this is my best approximation of it. I think it’s pretty close. |
[/avia_table]
WEATHERING:
Like all of the Max film two gear, the boots are dirty and weathered. In the movie, in addition to the dirt, it appears that the toes of Max’s boots have scuffed down to the brown leather beneath the black dye. It’s possible that this is just dirt, but it looks like scuffing in this screenshot for example:
[avia_table]
[/avia_table]
